Organize Your Inbox with These 7 Gmail Filters
Organize Your Inbox with These 7 Gmail Filters

Banish newsletters, marketing emails, and spam from your inbox forever. Automatically move emails from important contacts into a priority queue. Find old, unimportant emails, and batch delete them to free up space in your mailbox. A few Gmail filters are all you need.
Filters let you create rules for how Gmail handles incoming email. These rules tell Gmail how to manage your email for you, letting you automate the process of organizing your inbox. Here's everything you need to know about Gmail filters and the most helpful filters to set up now.
- How to Create a Filter in Gmail
- How to Edit and Delete Gmail Filters
- How to Create Precise Filters with Operators
- Filter 1: Automatically Delete Marketing Emails
- Filter 2: Automatically Archive Marketing Emails
- Filter 3: Automatically Label Marketing Emails
- Filter 4: Move, Archive, or Delete Specific Emails
- Filter 5: Create Multiple Inboxes for Different Accounts
- Filter 6: Automatically Empty Your Spam Folder
- Filter 7: Build a To-Do Queue
- How to Use Filters to Delete Old Emails
How to Create a Filter in Gmail
There are a few different ways to create filters in Gmail:
You can create a filter by clicking the down arrow in Gmail’s search box:
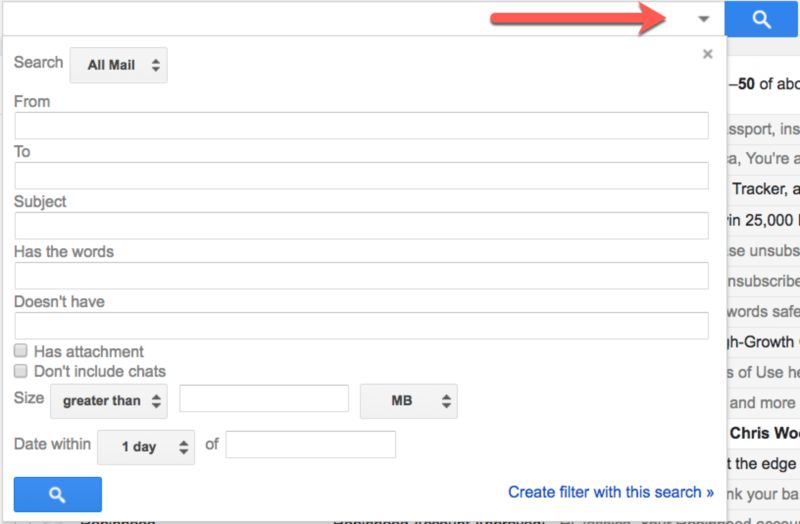
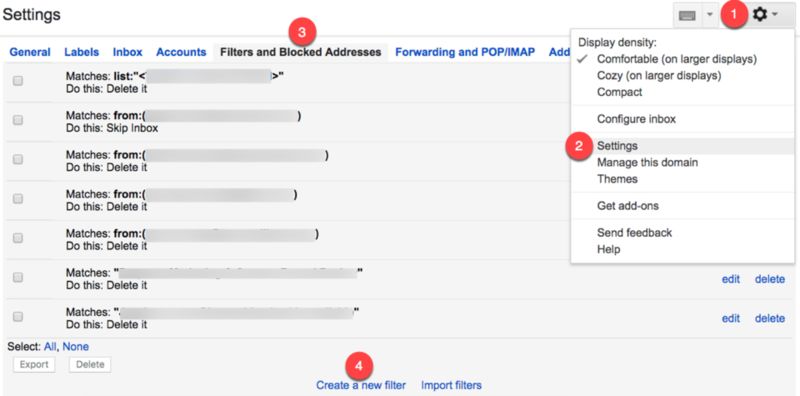
Or create a new filter in Gmail’s settings by clicking the gear icon, choosing “Settings," selecting the “Filters and Blocked Addresses" tab, and clicking the “Create a new filter" link.
Create a filter from a specific email by opening the email, clicking the “More" button, and selecting “Filter messages like these."

Whichever way you get to the filter creation form, there are multiple options for choosing filter criteria:
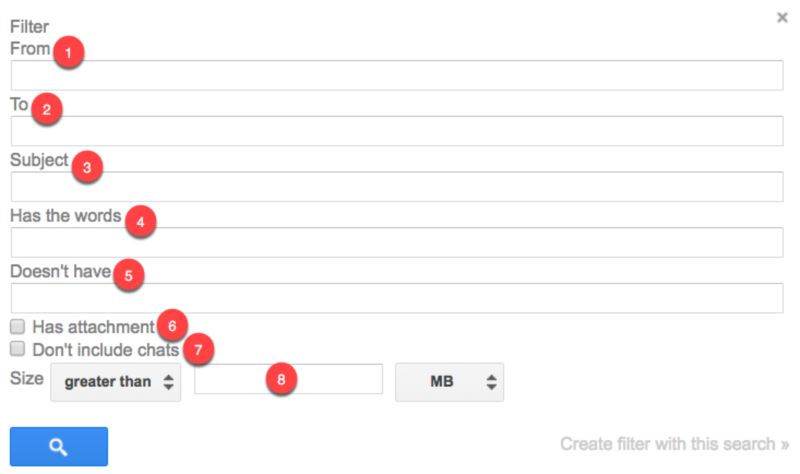
- From: Filter emails sent from a specific email address.
- To: Filter emails sent to a specific email address.
- Subject: Filter emails that use a specific subject line.
- Has the words: Filter emails that contain specified keywords.
- Doesn’t have: Filter emails that don’t contain specified keywords.
- Has attachment: Filter emails that include an attachment.
- Don’t include chats: Ignore Hangouts chats when applying filters.
- Size: Filter emails larger or smaller than a specific size.
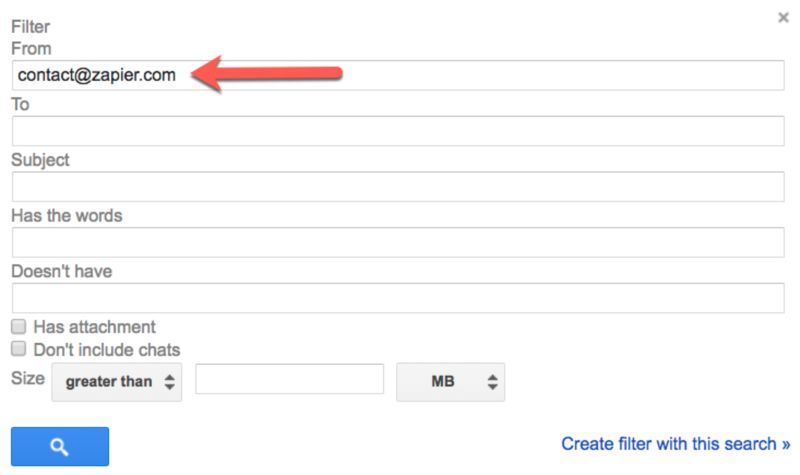
If you used the “More" option while in a specific email to open the filter creation menu, Gmail automatically fills in the from email address for you:
After selecting the criteria for your filter, click the “Create filter with this search" link to specify what Gmail does with emails that match this filter:
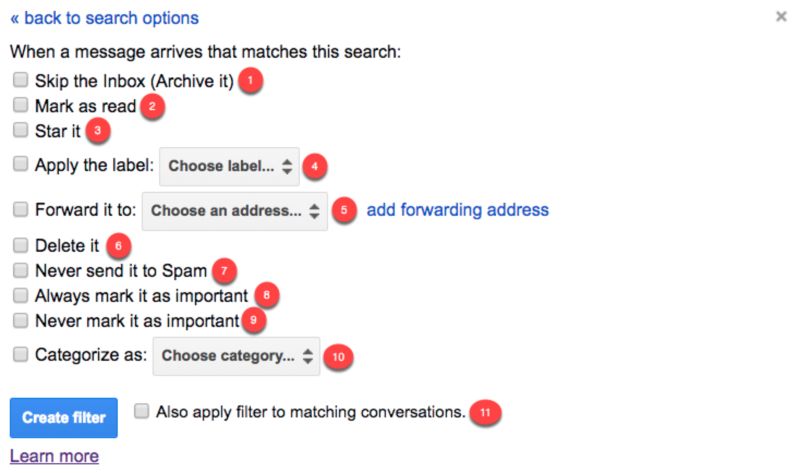
- Skip the inbox: Archive the email so it doesn’t appear in your inbox.
- Mark as read: Have the email appear in your inbox as an already-read item.
- Star it: Automatically star the email.
- Apply the label: Apply a specific label to the email.
- Forward it to: Automatically forward the email to a different email address.
- Delete it: Send the email to the trash.
- Never send it to Spam: Prevent Gmail from tagging the email as spam.
- Always mark it as important: Automatically tag filtered emails as important.
- Never mark as important: Tell Gmail not to tag filtered emails as important.
- Categorize as: Automatically categorize filtered emails.
- Also apply filter to matching conversations: Automatically applies the selected conditions to every email in your account (new, archived, and deleted) that match the selected filter criteria.
How to Edit and Delete Gmail Filters
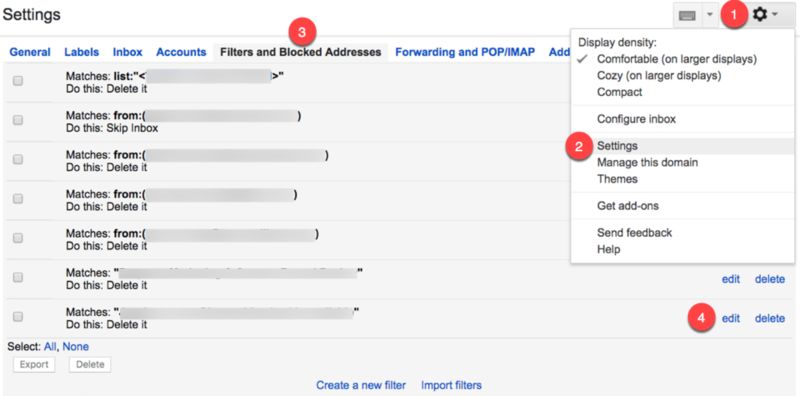
If your filters aren’t applying correctly or if you no longer need a filter you created, it’s easy to edit or delete Gmail filters:
- Click the gear icon.
- Choose “Settings."
- Select the “Filters and Blocked Addresses" tab.
- Find the filter you want to edit/delete.
- Click the “edit" link to update filter criteria and behavior, or click the “delete" link to delete it.
7 Ways to Organize Your Email Using Gmail Filters
Before we jump into the different ways you can use Gmail filters, let’s review the different types of operators that Google recognizes. Use these to create more powerful and precise filters:
We’ll provide more guidance on using operators while creating filters in the examples below.
With that in mind, we’re ready to start creating filters in Gmail. Here are some of our favorites.
Note that most of the examples below are based on newsletters and marketing emails, but if you adjust the words or phrases you use for your filters, you can use the steps below to manage any kind of recurring emails you might get, such as receipts from Amazon, bills from your utility company, or those "Fwd:" emails your well-intentioned family members keep sending you.
1. Automatically delete all newsletters and marketing emails
Unsubscribing from every newsletter and marketing email that arrives in your inbox manually is an epic waste of time when you can get Gmail to do it for you automatically.
This filter tells Gmail to send those messages to the trash, by watching for the word "unsubscribe" in the body of the email:
- Click the down arrow in Gmail’s search bar to open the create filter form.
- In the “Has the words" field, type unsubscribe.
- Click the “Create filter with this search" link.
- Check the box next to “Delete it."
- Click the “Create filter" button.
Now, any email that contains the word unsubscribe—which will cover the majority of the newsletters and marketing emails you receive—will be automatically sent to your trash folder.
If you find that this filter isn’t catching everything, expand it to include other words that are commonly found in newsletters and marketing emails. Open your filter to edit it, and add all of the words you want to filter on, separating each with the OR operator.
unsubscribe OR “view in browser" OR “view as a web page" OR “privacy policy" OR “click here" OR “view online" OR “update your preferences" OR “opt out" OR “manage your account"
Open any newsletter or marketing email that makes it past your filter and look for keywords and phrases that are rarely used in other types of emails. When you find one, add it to your filter.
Caution: Gmail will automatically delete every email that uses one of the keywords or phrases in your filter. You only have 30 days to recover deleted items from the trash before they’re permanently deleted. If you think the filter might catch a personal email, make sure to skim through your deleted items at least once a month, or consider using the archiving method described in the next example.
2. Automatically archive all newsletters and marketing emails
Auto-archiving newsletters and marketing emails works well if you’re afraid that you’ll unintentionally delete something important, but my personal favorite use case for this filter is for companies that occasionally send promo codes.
Here’s an example: I don’t need a notification in my inbox every time Kohl’s has a sale. But if I have Kohl’s marketing emails in my archive, I can search through the marketing emails I’ve recently received before I start shopping to see if any included a coupon code.
To create a filter that automatically archives newsletters and marketing emails:
- Click the down arrow in Gmail’s search bar.
- In the “Has the words" field, type unsubscribe (or use operators to include additional terms).
- Click the “Create filter with this search" link.
- Check the box next to “Skip the inbox (Archive it)."
- Click the “Create filter" button.
This filter sends all emails that include the word unsubscribe to your “All Mail" folder. While you won’t see the emails in your inbox, you’ll always have access to them in your archive.
3. Move all newsletters and marketing emails to a specific location
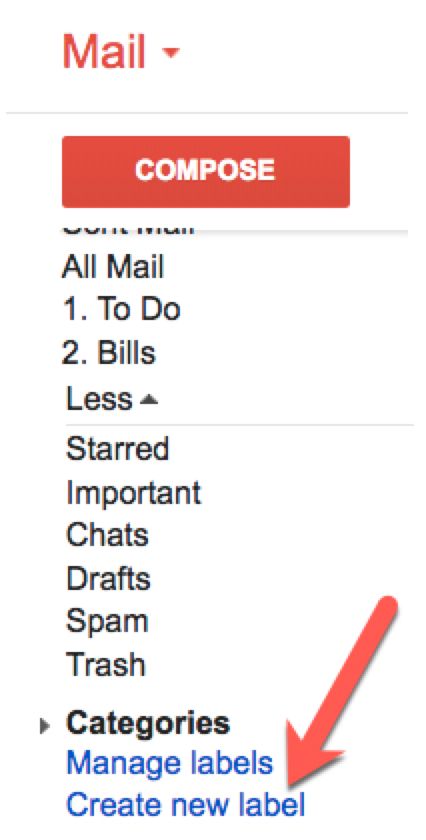
If you want to read the marketing emails and newsletters you receive, but just don’t want them clogging up your inbox, create a filter that automatically sends those emails to a to-do location. If you don’t already have a to-do location in Gmail, create a new label:
In your Gmail sidebar, expand the menu and scroll down until you see the “Create new label" link. Click the link.
Then enter a name for your new label, and click “Create."
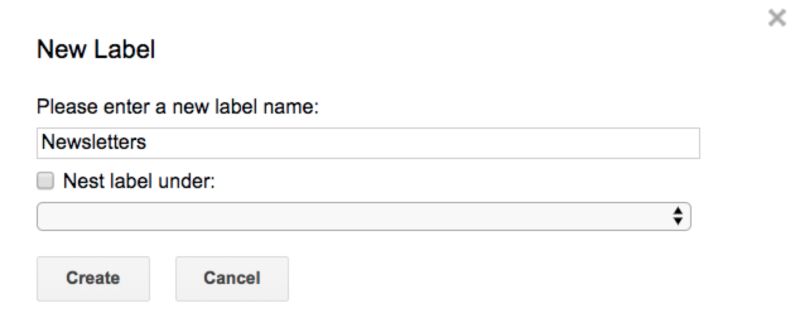
Gmail labels function like folders in Outlook and other email programs. Use them to sort emails into meaningful groupings.
Once you have a label for newsletters and marketing emails, create your filter:
- Click the down arrow in Gmail’s search bar.
- In the “Has the words" field, type unsubscribe (or use operators to include additional terms).
- Click the “Create filter with this search" link.
- Check the box next to “Skip the inbox (Archive it)."
- Check the box next to “Apply the label," and use the dropdown to select the label you created in the last step.
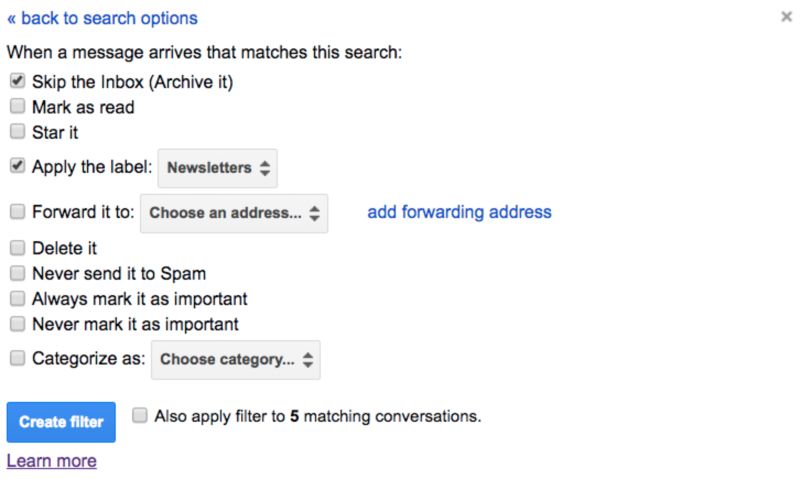
Now Gmail will automatically move all emails that contain the word unsubscribe to the label you selected. They won’t appear in your inbox, but they’ll appear as unread in your new label for review when you have time.
4. Delete, archive, or move emails from specific senders
The three examples above show how to use filters to batch delete, archive, or move emails, but what if you just want to apply those filters to specific types of emails or to emails from specific senders? There are a few ways to create more precise filters in Gmail.
1. Filter by email address:
If you want to automatically delete, archive, or label emails from one specific sender, type that sender’s email address into the “From" field of the create label form, then select the appropriate action for the filter (delete, archive, or label).

2. Filter by email domain:
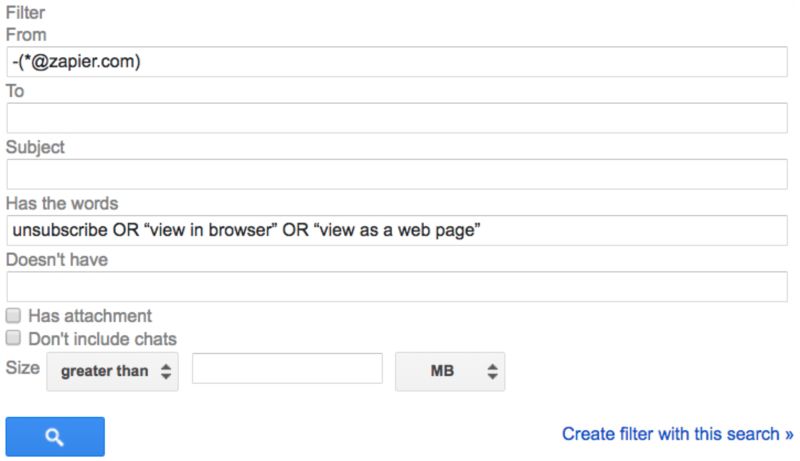
If you want to automatically delete, archive, or label emails for all senders from a specific domain/company, type an asterisk before the @ symbol (ex: *@zapier.com) to tell Gmail to apply the filter to all emails received from accounts on that domain.

3. Exclude certain senders from mass filters:
If you want to automatically delete most marketing emails but still want to receive them from one specific company, use the exclude operator to tell Gmail not to apply the filter to emails from that address/company/domain. Type the following into the “From" field of the create filter form, even if you’re also filtering on keywords, subject, or some other criteria: -(*@domain.com).
5. Create separate inboxes for different email accounts
If you manage multiple email accounts from a central account and want emails sent to each address to appear in separate inboxes:
- Create a label for each account.
- Open the create filter form.
- Type the email address for your first account into the “To" field.
- Click “Create filter with this search."
- Check the boxes next to “Skip the inbox (Archive it), and “Apply the label," and select the appropriate label from the dropdown.
- Click the “Create filter" button.
- Repeat these steps for each additional account.
This moves emails from your inbox to individual queues that mimic account-specific inboxes.
This filter is also helpful if you’re trying to retire an old email address and want to be able to see quickly where you still need to update your email address.
If you’re interested in managing multiple email accounts from a single Gmail inbox, check out our guide on how to merge multiple Gmail accounts.
6. Automatically empty your spam folder
Tired of spam emails piling up in your spam folder? Use this filter to automatically and permanently delete every email Gmail identifies as spam as soon as it arrives in your account:
- Click the down arrow in Gmail’s search bar.
- In the “Has the words" field, type is:spam.
- Click the “Create filter with this search" link.
- Click the “OK" button in the “Confirm creating filter" modal.
- Check the box next to “Delete it."
- Click “Create filter."
Caution: Though it happens rarely, Google will sometimes misidentify a legitimate email as spam. By setting this filter, you will have no way to sort through your spam folder to make sure nothing important landed there.
7. Build a to-do queue
I write a lot about productivity apps and tools, but when it comes down to it, my favorite place to keep a to-do list is my inbox. If there’s one way to guarantee that I won’t forget to do something, it’s to email myself a reminder the second I think about it.
Because I only ever email myself reminders of things I need to do—or send myself links to articles I want to read—I have a filter that automatically tags emails that I send myself with my to-do label. Here’s how to set it up:
- Create a to-do label, if you don’t have one already.
- Click the down arrow in Gmail’s search bar.
- In the “From" field, type your email address.
- Click the “Create filter with this search" link.
- Check the box next to “Skip the inbox (Archive it)."
- Check the box next to “Apply the label," and use the dropdown to select your to-do label.
You can also use this filter for emails other people send you—your boss, a client, an editor, etc.—that always include tasks you need to complete. Just substitute your email for theirs in the “To" field of the create label form, or use the OR operator to have Gmail automatically label incoming emails from any listed address (for example, "myemail@gmail.com OR boss@gmail.com").

If you prefer to manage your to-do list in a specific project management tool, combine this filter with one of the following workflows from Zapier to have your labeled Gmail emails automatically converted to tasks in your preferred productivity tool:

How to Use Filters to Delete Old Emails
One final helpful feature of Gmail filters lets you conduct a search with any filter criteria you create and automatically delete all archived emails that match that filter. This helps when you’re running out of space in your mailbox and need to delete things you no longer need.
Say you’ve been automatically archiving newsletters and marketing emails, but now you want to delete all of them to free up space in your account:
- Click the gear icon.
- Choose “Settings."
- Select the “Filters and Blocked Addresses" tab.
- Click the “edit" link next to your newsletter filter.
- Click “Continue" on the create filter form without changing any of the filter criteria.
- Uncheck the “Skip the inbox (Archive it)" box.
- Check the “Delete it" box.
- Check the box next to “Also apply filter to # matching conversations."
- Click “Update filter."

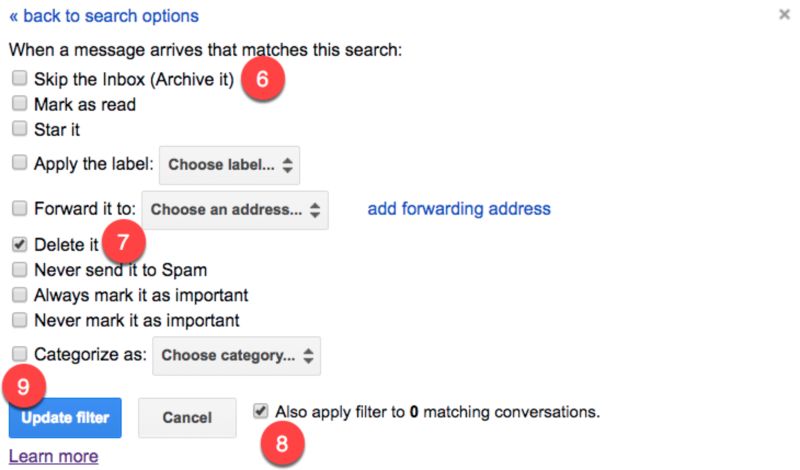
This automatically deletes all of the archived emails that were previously caught by your newsletter filter, which should free up a lot of space in your mailbox.
Once Gmail finishes the deleting process, just edit your filter again to set it back to archiving the emails. Repeat the process any time you need to free up space in your account.
Without Gmail filters, you're micro-managing your email, and where's the fun in that? Once you've set up these filters, you can come back every day to a cleaner, more streamlined inbox.
Keep Reading:
- A Guide to Optimizing Gmail: 30 of the Best Email Tips, Tricks, and Hacks
- The 25+ Best Gmail Add-ons, Labs, and Apps - Zapier
- How to Get to Inbox Zero and Manage Your Email - Zapier
Title photo by gabrielle_cc via Pixabay.

“I was wasting hours each week doing data entry. Now Zapier handles it seamlessly."
Nir Eyal, bestselling author

Build workflows with your apps.
Connect apps. Automate tasks. Get more done.

Take the Work out of Workflow
Zapier is the easiest way to automate powerful workflows with more than 1,000 apps.
Try Zapier Free
Email me about new features.
By signing up, you agree to Zapier's Terms of Service.
Source: zapier.com

